Custom sheet metal parts in as little as 3 days - Get a quote now!

Essential Tips to Drive Pin Nails Like a Pro?

When it comes to driving pin nails efficiently, many professionals rely on skill and experience. According to the National Association of Home Builders, improper nail driving can lead to costly repairs or safety issues. Industry expert John Stevens emphasizes this with his insight: "Precision is key when you Drive Pin Nails; a slight miscalculation can ruin your project."

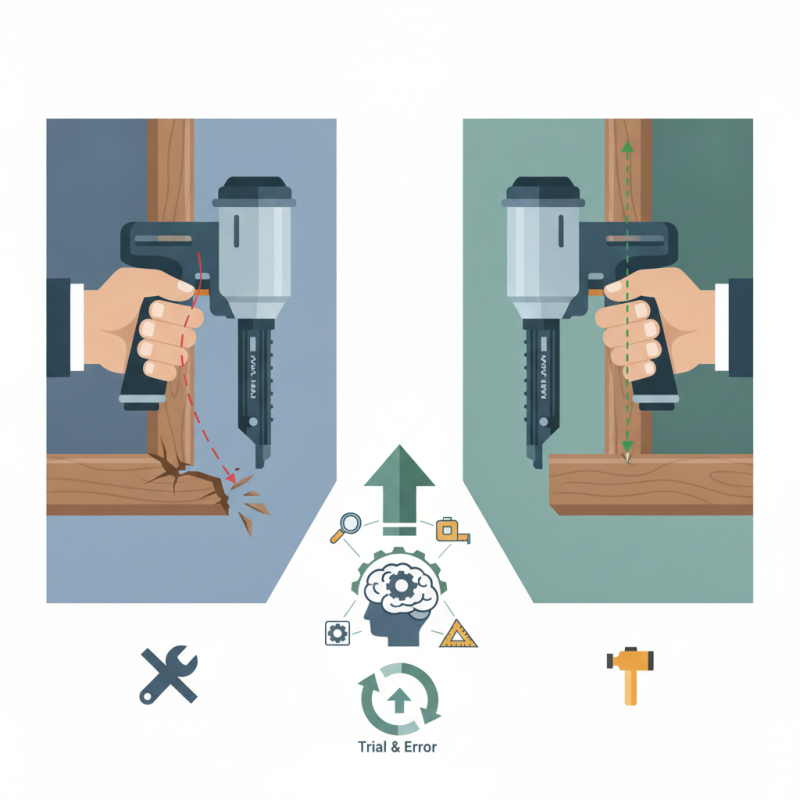
To drive pin nails like a pro, it's essential to understand both the tools and techniques involved. Many novice users underestimate the importance of angle and depth. Misalignment may cause nail buckling or splintering of the material. Each pin nail plays a crucial role in the integrity of the assembly. It's not just about getting the job done; it's about doing it right.

A well-honed technique is often developed through trial and error. Many skilled workers reflect on their early mistakes with pin nails, acknowledging that learning from failures can be invaluable. This journey towards masterful nail driving is not just technical, but also a testament to perseverance and dedication in the trade.

Essential Tips to Drive Pin Nails Like a Pro?

Choosing the Right Pin Nailer for Your Project

When selecting a pin nailer for your project, consider the type of work you'll be doing. There are various options available, each suited for specific materials and applications. A lightweight, compact model is ideal for intricate tasks, such as trim work or cabinetry. If your plans involve heavier-duty tasks, a more robust nailer can provide the necessary power.

Choosing the right size of pin nails matters too. Common lengths range from 1 inch to 2 inches. Shorter pins work well for delicate materials. Longer pins offer better holding power, especially in thicker wood. Always test different sizes on scrap wood to see what suits your project best.

Practice makes perfect. Familiarize yourself with the nailer's features before starting your project. Adjust the depth settings to ensure flush finishes, and practice on waste materials. Watch for misfires or jams, which can happen, especially with less experience. Reflection on these issues will improve your technique and outcomes, enhancing your skills over time.

Essential Tips to Drive Pin Nails Like a Pro? - Choosing the Right Pin Nailer for Your Project

Pin Nailer Type Pin Length (Inches) Compressed Air Requirement Weight (lbs) Best Use Case
Corded Electric Pin Nailer 1/2" to 1" N/A 4.5 Indoor Trim Work
Pneumatic Pin Nailer 1/2" to 2" 70-120 PSI 3.2 Heavy-Duty Projects
Battery-Powered Pin Nailer 1/2" to 1-3/16" N/A 5.0 Outdoor Projects
Manual Pin Nailer 1/2" to 1" N/A 2.0 Small Repairs

Understanding Materials and Techniques for Pin Nailing

When pin nailing, understanding your materials is crucial. Wood types vary in density and grain patterns. Softwoods like pine are easier to penetrate. Hardwoods such as oak require more power and technique. Knowing your material helps you choose the right pin size. For delicate materials, opt for thinner pins to avoid splitting.

Techniques also play a significant role. Holding the nail gun at a correct angle ensures a clean drive. Too steep an angle can cause the pin to ricochet or bend. Prioritize steady pressure and aim for consistent depth. Don’t rush; even pros make mistakes. You may find yourself pulling pins out to redo them.

Consider your workspace too. Clutter can lead to accidents. It’s best to set up a clean, organized area. Use clamps for added stability. Reviewing your technique regularly helps you improve. Reflect on each project. Learning from what didn’t work will enhance your skills.

Setting Up Your Workspace for Optimal Pin Nailing

Creating an effective workspace for pin nailing involves more than just having the right tools. It’s essential to arrange your area to minimize distractions. A clutter-free surface can significantly enhance productivity. According to a study, a clean workspace can improve focus by up to 30%. Keep essential items within reach and ensure that your workbench is stable.

Lighting plays a crucial role in pin nailing. A brightly lit workspace reduces eye strain and helps with precision. Natural light is best, but if that's not available, invest in good-quality lamps. They can help illuminate the finer details of your project. Consider the noise level, too. A quiet space allows for concentration, which is vital when driving pins accurately.

Ergonomics shouldn’t be overlooked. Position your workbench at a comfortable height to avoid strain. Proper posture can help prevent fatigue during lengthy projects. If you're using a pneumatic nailer, ensure your air compressor is easily accessible. This reduces the hassle, making it easier to get started promptly. Remember that every workspace is unique. Reflect on what adjustments can enhance your efficiency and comfort in pin nailing.

Mastering the Proper Technique for Driving Pin Nails

Driving pin nails effectively requires skill and technique. Mastering this can greatly improve your woodworking projects. According to a report by the National Association of Home Builders, nearly 75% of homes being built use pin nails for trim work and cabinetry. This highlights their importance in achieving a professional finish.

One of the essential tips is to select the right nail. Pin nails range from 23-gauge to 18-gauge sizes. A 23-gauge nail is perfect for thin materials, while an 18-gauge nail offers more strength for heavier tasks. Proper placement is crucial. Hold the nail at a slight angle for better penetration. This can prevent split wood, especially in softer types.

Practice can lead to perfection—but even seasoned professionals make mistakes. If a nail bends, it's critical to remove it and try again. Over-driving can cause surface damage. Hold the nailer firmly but adjust your grip if necessary. Your technique should evolve with experience. Getting feedback from peers can also highlight areas for improvement in your approach.

Pin Nail Driving Technique Comparison

This chart illustrates the average time taken by users of different skill levels to drive 100 pin nails. As experience increases from beginner to advanced, the time taken significantly decreases, showcasing the efficiency gained through practice and technique mastery.

Safety Tips to Consider When Using a Pin Nailer

When using a pin nailer, safety should always be your top priority. Start by wearing appropriate safety gear. Use goggles to protect your eyes from flying debris. Ear protection can help minimize noise exposure. Finally, ensure you have a good pair of gloves for a better grip.

Maintain a safe working environment. Make sure your workspace is well-lit and free from clutter. Keep your hands clear of the firing area. A sudden slip can be dangerous. Additionally, familiarize yourself with the tool’s components before use. Understanding the features is crucial, especially the safety lock.

Check the pin nailer for any damage before each use. A malfunctioning tool poses serious risks. When loading pins, ensure you do it in a safe manner. Pin your projects only at the correct angle. Incorrect angles can lead to missed targets or accidents. Lastly, always disconnect the tool when not in use. This simple step can prevent unintentional firing. With these safety tips, you can nail like a pro while being cautious.

Article Source: